Diagnostic Instruments—Keeping it Simple
Diagnosis is probably the most important part of endodontic care.
It determines the presence of disease, and then the specific type of disease. It leads us down pathways of treatment vs. no treatment. It guides our recommendations, discussions and explanations. It is the foundation of our entire practice and philosophy.
So I felt it would be a worthy blog to discuss just the simplest parts of endodontic diagnosis with specific focus on the instruments of a diagnostic work up. I am sure you are quite familiar with the tools you see in figure 1 (above). These are the standard instruments we use in our consultation setup tray. From left to right they are and EndoIce canister, a mouth mirror, an explorer, an pigtail explorer, cotton forceps with a cotton roll, a tooth slooth and a periodontal proble. What should be comforting to know is that for at least 80% of cases this is all that is needed for the diagnostic work up. In other words for 80% of the cases you may see in your office these simple tools will lead you to the right diagnosis and ultimate endodontic treatment plan. Let me add one brief qualifier: there are additional tools that I do not intend to discuss much of in this blog. Certainly I recognize technology like the microscope, CBCT imaging, electronic pulp tester, trans-illumination, etc are very valuable in an endodontic practice. Perhaps a future blog post can cover those instruments/techniques.
I would like to start by reviewing these simple instruments, how we use them and what significance we can gain towards the diagnosis.
Tooth slooth:
For us the tooth slooth serves two functions. Firstly, we use it as a bite test. We apply the tip end towards a cusp and simply have the patient give moderate to strong compression force. Thus the patient’s bite force is directed to just one cusp in a controlled and sustained manner (different than a percussion test which is quick and fleeting). We generally will test every cusp of the suspected culprit tooth and 2 teeth in both directions and a couple opposing teeth. Sometimes we will test contralateral teeth to gain a better sense of what is a normal patient experience of healthy teeth in an area far away from the pain source.

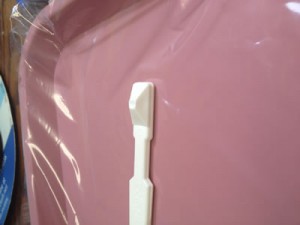
tooth slooth (figure 2)
We feel it is important to test so many teeth and so many cusps with this test as it can give us information not only to the localization of a painful biting response, but also help lead us into identification of coronal fractures. It is common for just one cusp of a molar tooth to elicit a pain response. This type of responsiveness could open the window for considerations of simple occlusal adjustments, localized cuspal fractures, and/or excursive interferences. Another important response to be aware of is the feeling of pain upon release of the biting force. This symptom is often associated with a coronal tooth fracture.
There are other materials that can be used for this test and I often do have patients bite upon more than just a tooth slooth. For example, I will have patients bite and grind upon a cotton roll which will allow them significantly more movement. I will also use a saliva ejector that has both the qualities of reasonable hardness, but also have the compressibility of plastic. Even using a rubber wheel can be quite effective (courtesy of a very bright dentist in our community). The point being that while a tooth slooth usually gives the needed results, it can be quite helpful to use other materials.
The tooth slooth doubles for us as the instrument of choice for a percussion test. I formerly used the backend of a metal mouth mirror, but I found my patients to make comments about “hitting their teeth with metal”, and their anxiety was thus higher than I felt it should be. I switched to using the backend of this hard plastic tooth slooth. Most importantly I found that the diagnostic results I attained were just as conclusive as a metal instrument with almost no anxiety of the percussion test. I will tell my patients that I will be tapping their teeth with plastic. I am certain that they are more at ease just by hearing the word “plastic” rather than seeing a metal mouth mirror. In supremely tender teeth, tapping with just a finger is enough to determine localization of pain. In the same way we test multiple teeth to biting, we will also test the same amount of teeth to percussion. I feel it is important to be consistent with testing all the same teeth with each diagnostic procedure.

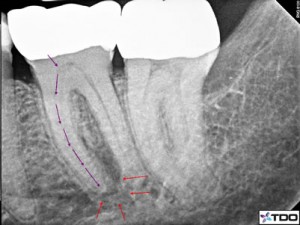
Progression of pulpal inflammation from coronal to apical direction. (figure 3)
The point of both percussion and biting tests is to assess the periodontal ligament diagnosis. An inflamed ligament will typically give off a pain response to either or both of these tests. Be careful to realize this is the diagnosis of the ligament condition and not the etiology of the diagnosis. The etiology can vary significantly with some conditions requiring endodontic treatment and some that do not require endodontics.
Look at figure 3 which will show the progression of endodontic inflammation traveling to the apical ligament space through the apical foramen. Essentially the pulpal inflammation within the pulp chamber will travel down the radicular canal space and into the apical tissues. Thus there is so often this link between the apical diagnosis and the pulpal diagnosis. Certainly there could be other factors leading to apical inflammatory conditions that are not the result of pulpal conditions such as occlusal trauma or root fractures, but again I am offering general rules to follow.
Cotton roll and Endo Ice (video):
This is the critical test for pulpal diagnosis. Again I recognize there are other tests to evaluated pulp conditions, but I will primarily just discuss the cold test in this blog. With the cotton roll we will simply tear it in half which loosens up the cotton fibers. We then pick at the cotton to create a ball of loose fibers that is about ¾ cm in diameter. Notice the “loose and a large amount” of cotton vs. a q-tip that is tightly wound cotton. The loose cotton will absorb significantly more coldness from the EndoIce (~-50 F) thus giving a better response from the patient.
There are many things that can influence pulpal reactions from patient to patient and tooth to tooth. Restorative materials upon the tooth can either increase or decrease the patients thermal responsiveness. Pulpal recession or calcification certainly affects our testing. Age of a patient can also affect testing as the pulp becomes more fibrous. Of course patient anxiety can affect their reactions too. To help avoid misdiagnosis we can gain a better sense of the accuracy by testing many teeth of a quadrant, an opposing quadrant and contralateral teeth.
With the proper assessment of other teeth we can gain a sense of what is a normal response for each individual patient. From there we can make a better judgment of the offending tooth if indeed one tooth reacts with significantly more acuteness, intensity and with a lingering response or if one tooth had a significantly delayed cold response or no cold response at all. We can then arrive at a pulpal diagnosis. As mentioned above in regards to the periradicular diagnosis, this assessment of the pulpal condition does not give the etiological reason for the pulp condition. That would be yet a separate assessment based on many factors.
In some cases we will employ a heat test. In our office we place a rubber dam on individual teeth and apply very hot water to the tooth as our assistant is suctioning simultaneously.
Periodontal probe, Mouth Mirror, Fingers, Pigtail explorer:
These are some of the more obvious instruments used that provide valuable information. However, I suspect that often times these instruments might even get overlooked. Simple concepts like checking for mobility or palpating the buccal tissue can give information on the periodontal status of a tooth or any swelling that might be present. We will often palpate the quadrant of concern both buccal and lingually/palatally and then compare that to the contralateral side. It can be surprising some of the differences your fingers can feel leading to more information about the conditions we are assessing.
Certainly the explorer can give great information about crown margins and/or submarginal decay that might not be picked up on a 2D radiograph. And perhaps most importantly a careful, multi-point probing of the attachment apparatus with the periodontal probe gives critical information about periodontal health. We probe around the sulcus of the offending tooth and adjacent teeth during the evaluation phase. Once the tooth and tissues are properly numb we will then probe again the offending tooth to make sure we have not missed anything.
I realize many of these instruments and techniques for diagnosis may sound very simple. But it never hurts to review their importance. As mentioned above if a complete exam is performed with just these techniques, you will arrive at the proper diagnosis at least 80% of the time. The other 20% might require more techniques, technology and your intuition. Never forget to use or develop your endodontic diagnostic intuition. Sometimes diagnosis does require the so called “gut feeling”. Just make sure that your intuition is backed by evidence.
**for the proper American Association of Endodontists glossary and definition of diagnostic pulpal and apical conditions please see our past blogs “Defining the Pulp Condition” and “Defining the Periapical Condition”.
Thanks for visiting Tri City and Fallbrook Micro Endodontics of San Diego, California.
